

MODO: Automation 101
Learning to code for MODO is daunting. In this quick post I'll suggest a logical, step-by-step approach to learning to customize, automate, and ultimately develop full-fledged API plugins for MODO.
“This article is big and scary.
Don’t worry.”
The MODO SDK lets you to start simple and work your way up.
You don't need to absorb this all at once.
This article is for anyone who wants to learn to write scripts or plugins for MODO.
I do have an ulterior motive: I often need to hire freelancers to help me code for Mechanical Color. Each one needs to learn the same things, so I'm writing the basics here. That said, this information is good for just about anyone who wants to automate common tasks in MODO, be it quick macros (i.e. lists of commands), simple "fire & forget" scripts (i.e. simple Python automation scripts), or full-fledged MODO API commands.
This article is NOT The Answer To All Your Questions. It is a starting point. A road map. A birds-eye view of the various things you'll need to learn in order to be a competent MODO developer. Mastering each topic will require lots of legwork on your part.
Learning to code for MODO is hard, but rewarding. If there's one thing you need to know before you get started, it's this: wear your Patient Pants. What documentation exists is scattered and disorganized, and there are at least One Million ways of doing any given thing. Even an experienced developer will need lots of help to learn to code for MODO.
Baby Steps
To be a true MODO automation guru, you'll need to familiarize yourself with the following subject areas, one-by-one, in order:
- Learn MODO
- Find Help
- The MODO command line
- Recording & Saving Macros
- Running Macros & Scripts
- Fire & Forget Python
- Script Query
- Configs
- Kits
- Form Editor
- Input Editor
- TD SDK
- Python Introspection
- lxu.command.BasicCommand
- Python API
- C++ API
Details
Learn Modo
This may seem obvious, but if you don't know how to use MODO, you'll be totally lost when it comes to automating it. If you're reading this post, there's a good chance you already know how to use MODO. But if you're a freelance developer working on a project for a MODO team, you may not be.
At a minimum you need to learn about creating/opening/closing scene files in MODO, creating and removing items in the MODO item list, modifying and animating an item's channel values, selecting items vs components, understanding item selection states in MODO (they're a bit weird to the uninitiated), and running commands.
And again, to state the obvious, you need to learn how MODO does whatever it is you're trying to do. "But I want to do it the way Maya does it." No. Just no. Don't expect MODO to behave like other apps. MODO is its own animal, and you need to learn to think the way MODO does. That doesn't mean we can't ape the behaviors of other apps, but it does mean that in order to succeed as a developer, we need to understand how to talk to MODO in a language MODO understands.
Find Help
You're going to need help if you want to learn to code for MODO. Things may improve in the future, but at the moment the documentation is scattered, disorganized, and best learned through:
- The MODO SDK Wiki
- The MODO SDK forum
- The MODO SDK Skype Channel
- The modo3d Slack #coding channel
- User gists
- User link dumps
- Asking somebody like me
I can't emphasize the importance of the MODO community here. It's one of the most open, honest, helpful, and generally friendly communities in the 3D world, and I'm deeply grateful for it. If you want to develop for MODO, become a part of the community.
The MODO command line
Alex Kucera has a really good example of how to drive MODO using the command line, and you can take a deep dive at the Command System overview on the SDK Wiki.
To get started, hit F5 to open the Command History palette, and click the History tab at the top. Now run some commands. Every command is here, along with arguments that modify the command's behavior.
Automating MODO is all about commands.
To learn more about a given command, click the Commands tab, click the F button at the top right, and search for the command.


The command is structured like this: command.name arguments
For the sake of clarity, you can also include the name of each argument in your command string: command.name argumentName:argument
Note: arguments are separated by spaces, so any spaces or special characters in your argument strings need to be wrapped in your choice of double-quotes "", single-quotes '', or braces {}. As a best practice, I recommend getting used to braces, as these cause the least disruption within your Python code.
This is best: item.name {My Great Item}
Extra credit: item.name name:{My Great Item}
Recording & Saving Macros
William Vaughan has a good 60 second overview, and you can take a deeper dive at the Macros intro on the SDK Wiki.
Put simply, click System > Record Macro. Run some commands. Then click System > Save To File. This will store an LXM file ("Luxology Macro") containing a list of each command in order. Macros are easy to create and modify, and a good way to learn about the MODO command system.
A simple macro that creates a locator item:
#LXMacro#
item.create locator
As you can see, the format is extremely simple: we have a simple shebang that tells MODO that it should interpret the file as an LXMacro, followed by a simple list of commands written exactly as they were fired in MODO.
Running Scripts & Macros
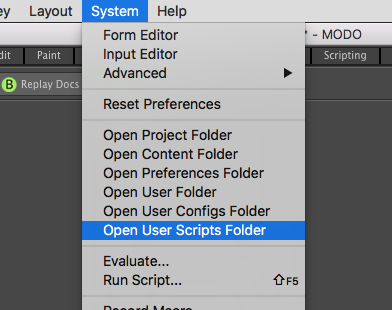
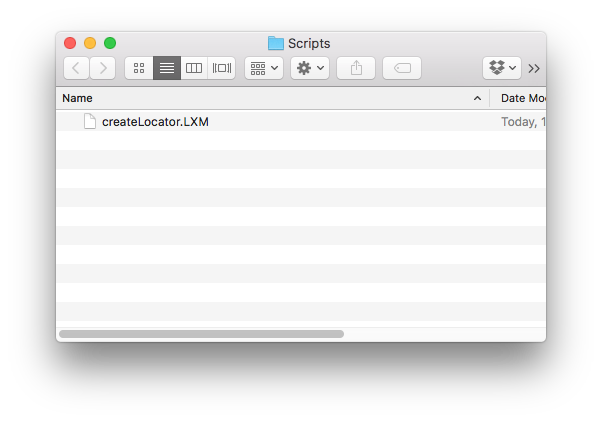
You can run your macro at any time using System > Run Script, but that is laborious. A quicker way is to use System > Open User Scripts Folder and drop your LXM file there. You can then run it using @scriptName.LXM in the MODO command line.
This same process applies to any "fire & forget" (i.e. uncompiled) script in MODO. Scripts written in Python or Perl work the same way: drop them in the user scripts folder and use @scriptName.xyz in the command line to run them.
NOTE: The MODO Scripts, Configs, and Kits directories are all the same thing, really. The difference is purely semantic. You can put python in the Configs folder or CFG files in the Scripts folder interchangeably. Honey badger don't care.

Fire & Forget Python
Once you've mastered Macros, the transition to Python is easy: just save the file as scriptName.py (not LXM), and replace the "shebang" at the top of the text file so that #LXMacro# becomes #python. Now just wrap each command in an lx.eval() statement. That's it! Now you're using Python.
The same macro, this time written in Python:
# python
lx.eval('item.create locator')
Now you can of course continue to work in your text editor of choice, running your scripts in MODO using the @scriptName.py syntax, but a much quicker and more direct method is to use the Layout > Palettes > Scripting palete.
In the Scripting palette you can simply type your script in the bottom pane and hit ctrl + enter to fire the script. Any print calls will be printed under the # Result line in the upper pane.
This UI makes it really easy to play around with scripts in real time. I doo the vast majority of my scripting experimentation right here.
NOTE: I do tend to use an external text editor for the bulk of my real development work. As you get started, brackets.io and atom.io are really good lightweight options. As you get more advanced, PyCharm is a really excellent Python-specific IDE, and its debugger works with MODO.


ScriptQuery
In simple fire & forget scripts, we can ask MODO for information using the ScriptQuery system.
NOTE: The ScriptQuery system is mainly for use with very simple scripts. As you become more advanced, you'll learn better, faster, and more direct ways of getting info from MODO.
The ScriptQuery system is broken into various "services," depending on the type of information you want to query. Your Python script can learn things about your scene, for example, by querying the sceneservice. It can ask things about commands using commandservice, or things about the MODO install itself using platformservice.
The following query will print the name of the currently selected item in the items list:
# python
print lx.eval("query sceneservice selected ? locator")
Notice that when we query the sceneservice selected attribute, we give it a type of item to ask for. Just about everything that appears in the MODO items list is actually a type of locator item. So we query the selected locator, and the result prints in the script editor output.
Note: The print function only works in the script editor. If you're writing your code in an external file, you'll need to use lx.out("hello!") to print to the System > Advanced > Event Log panel.
The ScriptQuery system may seem straightforward at a glance, but in practice it can be a little persnickety: each service behaves a bit differently from the others, and each attribute within a given service may not behave exactly like the others. The best way to learn about ScriptQuery is by experimentation and Lots Of Googling.
Seneca Menard is famous for this kind of scripting in MODO. A complete collection of Seneca's scripts is available from the community forum, and lots of individual ones are on his site. A great way to learn this kind of scripting is to read scripts like Seneca's and try to understand how they work.
Configs
Nearly every aspect of your MODO experience is stored between sessions using XML files called Config (CFG) files.
All of your preferences, recent files, tool settings, hotkeys, layout modifications, color schemes, forms, and even simple macros can be stored in Config files.
When a MODO session runs, it stores all of its preferences in RAM. When MODO successfully quits, it stores this information in the "MODO Config", which is just an XML file stored in your System > Open User Folder on Windows and Linux (modoXXX.CFG), or in your System > Open Preferences Folder on a Mac (com.luxology.modoXXX).
A good way to see just how pervasive the config system is in MODO is to open one of these config files in your text editor. You'll quickly see that nearly every aspect of your MODO experience is touched by this file.
When you have a problem in MODO, the first thing an advanced user will suggest is to delete the MODO Config file. This will reset your MODO install to its factory settings, fixing the vast majority of problems in the app. The problem, of course, is that this also deletes all of your favorite user settings.
In addition to your main MODO Config file, you can also create and install your own config files in System > Open User Configs Folder. Unlike the MODO Config file, these will never be modified by MODO, so you can be sure that the information stored there is safe.
For this reason, I recommend that all users take the time to make their own custom config files and save them in a safe place. This way you can reset your MODO config at any time with relative impunity.
You can export common config fragments using File > Config Export. I recommend trying this and looking at the output in a text editor.
More to the point, Configs files are the main vehicles for UI customizations in MODO.
When we create UI Forms, for example, each one will be stored in its own Config file. When we create and save custom Layouts, these are also stored in Config files. When we add hotkeys with the Input Editor, we save them using Config files.
Suffice to say, you need to cozy up to Configs if you want to do anything meaningful with the MODO UI.
Kits
A Kit is is a portable collection of Configs, Scripts, and content so you can easily move it from one machine to another. It makes installation easy.
With all those Config files floating around, we'll want to bundle them up into logical chunks for easy distribution. Most MODO scripts come with Config files. Kits let you roll those together into one clean install.
Good Kitty is my Kit-for-making-Kits, and I use it as the basis for pretty much every kit I make these days. In it you'll find examples of all sorts of common configs, as well as utilities for extracting important configs from your current MODO install.
Form Editor
Pretty much everything you click in MODO is a Form. Toolbars, right-click menus, menubar menus, popups, and popovers are all Forms. In fact, it's safe to say that if it's not a viewport or a list, it's a Form.
The System > Form Editor is a big topic, and one worth exploring in a separate article. If you master the Form Editor, you're well on your way to fully mastery of the MODO UI.
Input Editor
Like the Form Editor, the Input Editor is surprisingly pervasive within MODO: if you can access something with a hotkey, modifier key, click, drag, or other mouse/key/wacom event, it's controlled with the Input Editor.
Adding hotkeys with the Input Editor is easy. True mastery of the Input Editor is much harder. Like many system in MODO, the input editor is extremely flexible and powerful, but not entirely 'discoverable'.
A separate article is in order. Google "modo input editor" for some nice quickstart tutorials.
TD SDK
The TD SDK is the easiest, most intuitive, best-documented part of the MODO SDK. It's all object-oriented, Pythonic, clearly documented, and easy to introspect.
To use it, just import modo at the top of your Python file, and from then on you can make calls to it.
To create a locator using the TD SDK, we just tell the modo.Scene() object to do it:
# python
import modo
modo.Scene().addItem('locator')
This gives us much more direct access to our work than the lx.eval() method above. With the above code, for example, we can accept the result of the command into a variable, and then do things with it:
# python
import modo

locator = modo.Scene().addItem('locator')
locator.name = "My Great Locator"
My favorite reason to use the TD SDK over the old lx.eval() method is that objects in TD can be inspected using the dir() and type() methods discussed under "Introspection" below.
Note that most scripts use a mixture of command system calls (usually lx.eval() or lx.command()), TD SDK called (like modo.Scene().whatever above), and Python API calls where needed. You don't have to choose one or the other, you can use all three as appropriate.
Python Introspection
Introspection refers mainly to the dir() and type() functions in Python. These powerful tools make it much, much easier to learn the MODO Python API.
For example, when writing the TD SDK tutorial above, I couldn't remember the modo.Scene() method for adding an item. To find out, I ran the following script in the Script Editor:
# python
import modo
print dir(modo.Scene())
# Result:
['_Scene__ItemAdd', '_Scene__setupTextureLayerType', '__class__', '__contains__', '__delattr__', '__dict__', '__doc__', '__format__', '__getattr__', '__getattribute__', '__hash__', '__init__', '__module__', '__new__', '__reduce__', '__reduce_ex__', '__repr__', '__setattr__', '__sizeof__', '__str__', '__subclasshook__', '__weakref__', '_allItems', '_item', 'actors', 'addActor', 'addCamera', 'addGroup', 'addItem', 'addJointLocator', 'addMaterial', 'addMesh', 'addRenderPassGroup', 'camera', 'cameraCount', 'cameras', 'chanRead', 'chanWrite', 'currentRange', 'deformers', 'deselect', 'duplicateItem', 'filename', 'fps', 'getGroups', 'groups', 'item', 'itemCount', 'items', 'iterItems', 'lightCount', 'locators', 'meshCount', 'meshes', 'name', 'removeItems', 'renderCamera', 'renderItem', 'renderPassGroups', 'scene', 'sceneItem', 'sceneRange', 'selSvc', 'select', 'selected', 'selectedByType']
By printing the dir() for the modo.Scene() object, I was able to see the addItem() method.
I was then able to read the docstring for the addItem() method to find out how to use it:
# python
import modo
print modo.Scene().addItem.__doc__
# Result:
Add a new item to the scene
        :returns: item
        :rtype: modo.item.item
        :param itype: item type
        :type itype: modo.Constant
        :param name: optional name for the item.
        :type name: basestring
        :raises TypeError: When failing
As you can see, pretty much everything I need to know about the addItem() method is included in the docstring.
Introspection is a big topic in Python development, and one I hope you'll look into more deeply. With these tools you'll find developing scripts for MODO much, much easier than relying on docs and tutorials.
lxu.command.BasicCommand
The MODO Python API allows us to write first-class MODO commands that behave exactly like every other native command in MODO.
To write a MODO command, you need to create a subclass of lxu.command.BasicCommand and modify it to suit your specific needs. It is complex system, but extremely flexible.
To make commands easier to write, I created Commander. Commander is a wrapper for the BasicCommand class that makes it much simpler to create typical command UI elements like popup menus. There are lots of examples on the github repository page. I use it for all of my commands these days, and I recommend it to others.
Python API
The Python API provides deep access to nearly every part of MODO. The downside is that unlike the TD SDK, the Python API is poorly documented, decidedly un-Pythonic, and quite confusing to the uninitiated.
If TD SDK will do the job, use it. It's simpler, easier to read and write, and generally much more elegant.
If, however, you find that TD is too slow, you may need to upgrade to the full Python API. For example, if you're tagging millions of polygons, you'll need to use a layerscan object if you want reasonable performance. Beware: There be dragons.
C++ API
If you need maximum performance and conrtrol, the C++ API (aka C++ SDK) gives you the deepest, fastest access that MODO has to offer. If you want to write your own channel modifier, shader, or interactive modeling tool, C++ is the way to go.
The upside of working in C++ is that it has much more thorough documentation than the Python API above.
Most artists will never learn the C++ API. It's for programmers.
“Get to work.”
MODO is one of the most extensible pieces of software I've had the pleasure of using.
In fact, extensibility is one of the main reasons I use MODO in my work. Try it.

